• Home
  • About & Contact
  • Restaurant Reviews
  • Product Reviews
  • SHOP
instagram twitter

The Graphic Foodie | Brighton Food Blog & Restaurant Reviews


There are some dishes that are more than just food. Comfort, memories, family, heritage... Brodo, an Italian chicken broth, is made when ill, when you have weary travellers arriving, and even when celebrating. A version of this is found around the festive period with mini veal meatballs and even weddings with tiny tortellini.

If my kids come home from school and smell that this has been cooking during the day for them, the sound of bags and shoes hitting the floor (ffs) is always joined by excitement and thats-exactly-what-I-wanted sighs. I love knowing this will definitely form part of their childhood food memories. 

Easy to do with just a little faff.

Into a large pot throw:
  • 1kg chicken drumsticks
  • 1 onion, halved
  • 1 tomato, quartered
  • 1-2 carrots, halved
  • 2 sticks of celery, chopped in half
  • 1 tsp whole peppercorns
  • Contentious, but I always throw in a Knorr Chicken Pot too.
  • Optional: a small piece of brisket or stewing beef. This will enrich but nit essential.

Cover with about 1.5 litres of water, or juat enough to cover everything. The size and shape of your pot will determine this.

Bring to the boil, then simmer gently for 1.5-2 hours. The broth will reduce but don’t let it reduce too much. Remove any scum that forms on top, but I don't tend get much using drumsticks.

Turn off the heat and ideally allow everything to cool down a little.

Pour the whole lot into a colander over a large bowl. Give the pot a clean them pour the broth only back in, keeping the chicken, bones and vegetables aside.

Put some small pasta shapes on to boil (pastina, orzo, tiny tubes) and in another pot boil some finely shredded leafy greens (spring cabbage, cavolo nero, savoy).

Meanwhile pick though all the meat carefully, discarding bones, skin, veins. Set aside in a bowl. Lightly shredding any large pieces. If you've added any brisket or beef, chop this up roughly too.

Optional: In a separate bowl, using a hand blender, blend one of the reserved carrot pieces, a piece of tomato if that exists still, a couple of celery pieces and a half ladle of broth to make a paste. Add just a heaped tablespoon or two of this back to the broth pan to give a little body to it, but not much.

Taste broth for seasoning. May need a pinch of salt but not much. Reheat gently.

Drain pasta and cabbage.

In large soup bowls add some shredded chicken, pasta, cabbage to each, then top with a few ladels of your hot broth.

Add peperoncino flakes or some grated parmesan.

Feel 1000% better. Mamma knows best.
Share
Tweet
Pin
Share
No comments

Red radicchio is one of my favourites. Slightly tricky to find but if you do, this is so worth trying. Griddling softens and sweetens its typically bitter taste so is an ideal cooking method if you aren't enjoying it raw. You can then dress the cooked radicchio with lemon juice or better, with real balsamic of Modena. The thick, sweet and rich stuff.

1 radicchio head, cut into quarters lengthways, retaining the base and core to keep it together.
olive oil
sea salt flakes (I love Maldon)
Lemon juice or aged balsamic of modena 

Heat the griddle pan on a high heat. Brush the raddichio quarters in olive oil and grill on each side until softened and slightly crisp on the edges.

Remove and allow to cool a little. Dress with more olive oil, sea salt flakes and either lemon juice or balsamic of modena. 

Serve warm or at room temperature.
Share
Tweet
Pin
Share
No comments

Ah, the stuffed pepper. Are they not what you serve vegetarians when you can't think of anything else to give them (Come dine with Me contestants take heed)?

Actually no, I've been baking these more lately, they are a great vehicle to carry flavour as well as being a pretty convenient serving solution. I also love that sweet, mellow, squishiness once baked. Add that to the fact they are rammed with vitamins E and C (skin creams can only do so much to your face peeps).

The European Union have actually funded a campaign to educate the nation about the versatility and health benefits of peppers. You can find out more from itspeppertime.co.uk (I can't get Chico out of my head every time I think of it.)

Also on their site, they include a lot of recipe inspiration including what they call "Pepper pots" - stuffed pepper halves to you and me. The versatility of this is endless, but the recipe below is how I like to prepare them for my family.

Filled with beef and lentils this is a great combination of Iron and Vitamin C (which helps absorb Iron - bonus). The lentils also make the beef go further so economical as well as healthier. Texture, taste...it's all there as well as being so easy to prepare. Total mid-week hero.


Serves 4

4 peppers (red, orange or yellow are best)
1tbsp olive oil, plus more to rub over the peppers
Half an onion, finely chopped
2 cloves of garlic, finely chopped
400g lean minced beef
Half tsp chilli powder
Half tsp smoked paprika
1 tsp cumin
1 tsp ground coriander
400g tin chickpeas, drained ad rinsed
300g cooked green lentils (tinned and drained or better cooked from dried)
200g tomato passata
Seasoning

To serve: natural yogurt, salad leaves and fresh herbs (coriander or parsley are great)

Preheat the oven to 180C. Halve the peppers lengthways and deseed, rub the pepper surfaces in a little olive oil. Place on an ovenproof tray

Heat the oil in a frying pan. Add the onion and gently fry until translucent. Turn up the heat and add the beef and garlic. You want the meat to sizzle not stew. Break up the meat with a spoon as it cooks until evenly browned.

Add chilli powder, smoked paprika, cumin and ground coriander and cook for a minute. Then add the chickpeas, lentils, tomatoes. Season to taste.

Once cooked, spoon the beef into the pepper halves and place in the oven. Bake for 20 minutes for firmer peppers or up to 40 minutes if you like them squishy.

Let them rest for a few minutes, then serve with a dollop of natural yogurt, a side salad and plenty of chopped fresh herbs.

http://www.itspeppertime.co.uk/

I was sent products for this post by the campaign, content and thoughts, as always, my own.
Share
Tweet
Pin
Share
No comments

Mr GF, who thinks I'm turning him vegan with my streamlining of our meat consumption recently (I'm not, I'm just trying to buy better, less often), thought it was his birthday or something when he saw we were having this for dinner. 

It's simple to prepare and great if you are self employed at home like me ideal to throw it together in 5 then pop in the oven for 1.5 hrs. The potatoes will cook in the pork fat too so the flavour is fantastic. 

This was another of my #organicunboxed recipes that I created with my mystery box of ingredients. The pork was from The Well Hung Meat Company based in Devon. Their animals are grass fed and dry aged on the bone for up to 28 days. Plus they don't use any freaky chemicals, opting for traditional and sustainable farming instead. I know full well that had I bought this meat in the supermarket, the amount of water released in cooking would have been quite considerable. Plus the flavour of this meat was superb. I don't think all produce needs to be organic but one area that does benefit is meat. 

Serves 2-3
500g Pork belly slices
4 large potatoes, peeled and cut into chunks
Small red onion, chopped
2 sprigs of rosemary
Freshly ground black pepper
Olive oil

Preheat the oven to 200C

In a baking tray, lay the potatoes in a single layer. Scatter over the red onion then lay the pork strips on top. 

Break the sprigs of rosemary into a few pieces then tuck between the meat and potatoes.

Season with freshly ground black pepper and drizzle with olive oil.

Roast for 1.5 hrs, tuning the meat half way through.

Remove pork strips, keep warm and rest for 15 minutes. Meanwhile, return the potatoes to the oven to crisp up a little. 
Share
Tweet
Pin
Share
No comments


No, these aren't desperate times for a hard working mother. I'm not sloshing liquid sin in every meal I create (just yet).

Remember when vodka sauce was the thing for pasta? (it happened, I promise you, it happened). And if it still seems strange to you, then think of how common wine is to add to your pasta sauces. This is based on the dish penne alla vodka, a rich, creamy sauce. The alcohol isn't really a strong taste, it just seems to amplify the tomatoes and give them an edge.

I like vodka sauce with spice, mainly as vodka has a mild taste in cooking it needs another element for interest. But gin has more character so I think it's best left alone. Same story with the pancetta commonly found in this dish. But the cream and butter? Well, that remains.

This is a dish I have created for #organicUnboxed campaign, so it's totally good for you*


Serves 4

(all ingredients I used were obviously organic!)
10g Butter
1 tbs olive oil
1 small onion, finely chopped
2 cloves of garlic, finely chopped
500ml of passata or a 400g tin of tomatoes, blended
170ml of gin (I used Juniper Green Organic gin)
150ml single cream
400g dried penne pasta
Freshly grated Parmesan to serve

Heat the butter and olive oil in a saucepan and gently fry the onion until softened but not coloured. Add the garlic and continue to cook for a minute.

Add the passata or blended tin of tomatoes, season well and reduce for 10 minutes.

Add the gin and reduce a little for 5 minutes.

Remove from the heat and add the cream. Check seasoning.

Stir through drained pasta. And serve with freshly grated Parmesan cheese.


 *OK, probably not.
Share
Tweet
Pin
Share
No comments

Aqua Pazza means "crazy water" which makes this a really fun sounding recipe. Apparently the dish comes from southern Italian fishermen cooking their fish for lunch in the little they had; sea water and a few herbs, possibly a tomato or two. It was made famous around the Capri area in the 50s and 60s by visiting tourists wanting a taste of something authentic.

Schwartz, the herb and seasoning company got in touch with me about creating a recipe and this was one of the first dishes to come to mind as it's ALL about the herbs and seasoning. Oregano is one of the most important Italian herbs and I always have a jar of the dried herb in my larder. In addition, you can use most Mediterranean flavours although I always like an acidic edge that either capers or olives bring. Aqua Pazza is a really gorgeous, light and fragrant dish for pretty much any white fish and really quick for a mid-week meal.

http://www.schwartz.co.uk


Serves 2

Ingredients
2 Fillets of firm white fish (sea bass or bream is perfect) or a whole prepared fish
3 Tbs olive oil
A few sprigs of flat leaf parsley, roughly chopped
Half tsp of Schwartz dried oregano
2 Garlic cloves, peeled
Half a celery stick, chopped
8-10 cherry tomatoes or two ripe chopped tomatoes
Small handful of capers or olives
A little fresh red chilli, sliced

Half a glass of water
Half a glass of white wine
To serve: Sliced lemon and good bread

Method
Preheat the oven to 200C

In an ovenproof dish which will fit the fish in a single level, pour in the olive oil then the fish. Arrange the remaining ingredients around the fish (if using a whole fish then stuff the cavity with some of the parsley too) and pour in the water and wine. The liquid should come to about halfway up the fish, and never cover the fish entirely. Season well.

Bake in the over for about 20 minutes until the fish is cooked, it may need a little longer if the fish is whole.

Serve with slices of good crusty bread and lemon slices.

This post was written in collaboration with Schwartz. Thanks for supporting the brands that support The Graphic Foodie.
Share
Tweet
Pin
Share
No comments

I had to laugh getting a press release about giving my morning a "make over", maybe playing to some music or making time to listen to the birds sing.

I don't think anything prepares you for the sheer horror of what your mornings become after having children. Pre-kids I would have a lie in at the weekends, get up early to exercise before work, have a full body stretch or read a damn newspaper. I haven't read a newspaper over morning coffee in FOUR YEARS. Lie ins? Pah ha ha ha ha!! Now, I emerge to the sound of screaming, usually around 6am latest after an average 4 hours sleep, my hair a scary mess from getting up and down in the night to the baby, wrench the four year old out of bed and wrestle his clothes on whilst he climbs up the curtains, builds Lego or pretends to be a flamingo (sometimes all at once). I then somehow have to wash and feed these kids, sort my face out and try to put an acceptable outfit together, prepare lunches, yell at the husband to get up and wipe the breakfast cereal off the table/wall/ceiling all before the various nursery runs. Yes, my snooze button is a fading memory.


But one thing I always do is make a decent breakfast. Always. Seriously. No rug rat will ever get between me and a decent feed. My week-day favourites are:
  • Porridge topped with a seed mix and fruit
  • Grilled tomatoes on toast
  • Eggs of any kind
  • An overnight bircher
  • Soughdough and avocado, chilli and lemon

On weekends we'll always have my husband's amazing fluffy pancakes because they really are the best thing since sliced bread.

Alpro is a brand I use anyway, mainly their milks, but they sent over their latest plant-based soya yoghurt so I tried something a little different and created a corn fritter recipe. These were absolutely delicious topped with avocado, grilled cherry tomatoes and lime wedges, served with spicy dressing (I love a kick of chilli in the morning). They'd also be great for brunch or lunch too.

Sweetcorn fritters with Alpro chilli, garlic and coriander dressing

Serves 2-3

Sweetcorn fritters
100g plain flour
1 tsp baking powder
Pinch of salt
1 egg
100ml milk or Alpro Almond unsweetened drink
280g sweetcorn (either tinned, drained or defrosted)
A handful of fresh coriander, chopped
2 spring onions, sliced thinly
Olive oil for frying

Garlic, chilli and herb dressing
150g Alpro Simply Plain
2 garlic cloves, peeled and crushed
1 green chilli, chopped finely (keeping the seeds for extra heat optional)
A handful of fresh coriander, chopped finely
Juice of half a lime
1 tbsp olive oil
Salt

To serve
Sliced avocado
Cherry tomatoes, grilled and seasoned
Lime wedges

Sift flour, baking powder and salt in a bowl. Make a well in the centre then crack in the egg and half the milk/drink alternative. Beat with a fork until combined then add the remaining milk/drink alternative and continue to beat until you have a smooth batter. Fold in the sweetcorn, coriander and spring onion and allow to stand for a few minutes.

Meanwhile make the dressing by combining all of the ingredients and season to taste.

Heat a large frying pan and drizzle a little olive oil in the pan. Add a couple of heaped tablespoons of the batter to the pan and flatten slightly to for a patty. Fry in batches until golden on both sides.

Serve the fritters with your dressing, sliced avocado, grilled tomatoes and wedges of lime.

Thanks to Alpro for sending me the products.


Share
Tweet
Pin
Share
No comments
Where food/drink and design meet is a pretty sweet point for me and the Lavazza 120 year anniversary tins are just delightful things to own. They echo classic Italian advertising graphics of the 40s and 50s. Each of the designs draw on Lavazza's past - the stylised coffee cup on the blue tin is reminiscent of the Qualità Rossa advertisement from the Seventies, the grey tin shows a revamped version of Lavazza’s first institutional 1946 logo and the white tin is a reworking of one of the historical symbols of the Lavazza brand: the steaming coffee cup, previously used in cafés. 

Lavazza were kind enough to send me the full set, and they contain a special blend of Brazilian Arabica coffee, to commemorate the anniversary.


My family have been drinking Lavazza for as long as I can remember, certainly waaaaaaaaayyyyy before coffee became a “lifestyle choice” and before people who served coffee became "man bunned and sockless" (God, I love this article). I even remember my parents packing it into their suitcases on their return from visiting our family village (after dropping off boxes of PT tips to the Italians!). 


Italians also use coffee in their desserts a lot, and not just for tiramisu. Lavazza have a lot of inventive recipes on the site including coffee cheesecake with honey jelly, espresso granita with ricotta cream or a morning barley cake. The drink recipes (hot, cold and cocktails) are also pretty good, I mean, who doesn't want to offer their guest an after dinner shakerato? 

Espresso martinis, huge in the 80s,  have made a comeback and it's quite an easy cocktail to make too. (Recipe from the Lavazza site)

25ml espresso
30ml vodka
30ml Frangelico
6 ice cubes
5g sugar

Make an espresso and add sugar. Place the ice, sweetened coffee, vodka and Frangelico in the shaker. 

Shake well and pour the contents into a martini glass.

http://www.lavazza.co.uk/uk/

Thanks to Lavazza for the set.
Share
Tweet
Pin
Share
No comments


When I think of campfires I think of cowboys. When I think of cowboys I think of ranches. When I think of ranches I think of rancheros huevos. And here we are. An obscure, mashed up train of thought whose destination is typically always my stomach.

But when you are thinking about campfire recipes, you don't want to be sat there slaving over a hot, er, campfire. No, no, no...that fire burns for marshmallows on sticks, warmth for rubbish singing and flickering through scary stories. You need quick, easy to prepare, yet delicious food. I've been camping a lot in the past and food wise, always eaten really well. Prosecco and venison pate is almost as essential as bug spray and I'll always remember the bemused faces of other hikers as I prepared a three course lunch on the top of Ben Lomond with nothing but a PocketRocket stove. Kendal mint cake? As if.

When Park Resorts asked me to create a recipe for them, I thought rancheros huevos would be ideal as the ingredients travel well without refrigeration and are a great protein hit. The recipe also translates well into cooking over a fire, adding a smokey element. You don't need all of the herbs or toppings if you are camping proper and packing space is sacred, but if you can, add them to make a fireside feast.


Serves 4

Ingredients
2 tbs olive oil
1 medium onion, diced
1 large red pepper, deseeded and chopped
2 cloves of garlic, chopped finely
1 red chilli pepper, chopped
Half tsp smoked paprika (optional)
Half tsp oregano (optional)
2 large, ripe tomatoes, chopped
1 can of black eyed beans, drained and rinsed
4 eggs
Seasoning

To serve:
4 corn tortillas, warmed over the fire
1 avocado, sliced (optional)
Fresh coriander (optional)
Lime wedges (optional)

Method
Place a heavy frying pan, or better cast iron pan on a grill over the fire.

Add the olive oil and then the chopped onion, red pepper and chilli. Cook for a few minutes. Stir in the drained black eye beans, garlic, tomatoes, oregano and smoked paprika (if using). Cook until softened and tomatoes have thickened slightly.

Make four wells in the tomato and peppers and crack the eggs into each space. Cover with tin foil or lid and cook for a few minutes, the yolks should still be runny but the whites set well.

Meanwhile, warm the tortillas by wrapping in tin foil and placing on the lid or in a separate pan over the campfire.

Season well and serve the tomato/peppers and one egg with or on top of the tortillas and any of the optional toppings you have.
Share
Tweet
Pin
Share
No comments

Poached pears are an incredible carrier for flavour, normally wine or spices added to the poaching liquid. But something totally different would be to cook the pears in tea and you could try an unusual tea like this Bonfire Toffee from Bluebird Tea Co. (use a real blend like this, not a tea bag of any kind). The caramel, apple, toasted cinnamon and smoke from this tea really makes this a perfect autumnal dessert. I also loved the vibrant, firework spark flecks of safflower in it too.

You can serve it with ice cream, cream or best, a sweetened marscapone. The best thing is that as the dairy mixes with the served poaching liquid, you get a proper milky cup of tea in the bottom of the bowl too!


Serves 4

15g of loose tea leaf blend (I used Bonfire Toffee from Bluebird Tea Co.)
1ltr of boiled water
1tbs honey
4 ripe but firm pears, such as Conference or Sweet William, peeled with stems left attached and the base cut flat so they sit upright.
To serve: Marsapone cheese sweetened with a little sugar, vanilla ice cream or pouring cream.

Put tea and boiled water into a saucepan (big enough to later hold the four pears reasonably snugly). Allow the tea to brew for 15 minutes.

Add the pears to the pan, submerging completely, and heat over a medium flame until the tea begins to simmer. Continue to simmer for 15 minutes. 

Remove from the heat and allow the pears to cool in the tea. Remove the pears and strain the poaching liquid.

Serve warm or at room temperature with a few spoons of the strained poaching liquid plus your choice of sweetened marscapone, ice cream or pouring cream.

I was sent the tea to create a recipe with.
Share
Tweet
Pin
Share
No comments

I like to think of a good meat marinade as elements. Really you can use any flavour you fancy, but the fundamental foundations are roughly as follows:

Oil 
Obviously useful to cook the meat but also as a carrier for your flavours to stick to and infuse the meat
Acid 
I use vinegar, wine or lemon juice mostly, but you need an acidic element to tenderise the meat.
Flavour
Garlic, herbs, zest, spices...anything you like.
Seasoning
Not only savoury (salt, mustard, soy) but sweet too like sugar, honey and maple syrup.

Think a few hours or up to one day ahead and pop the meat (or fish) in a ziplock food bag or lidded container, add the marinade and perk up that mid-week meal. Prior planning and preparation and all that.


Porchetta-inspired pork marinade (top image)

Porchetta is an incredibly popular dish in Italy. We'd buy slabs of it on market days from the spit-roast meat stalls for an easy and late lunch, served with a salad. So this is where I'm finding flavour inspiration for this zesty marinade. Serve with salad and sauté potatoes.

2 pork chops or steaks

Juice and zest of half a lemon
30ml olive oil
1 garlic clove, crushed
6 fresh sage leaves, chopped
2 sprigs fresh flat leaf parsley, chopped
6 peppercorns, crushed
Half tsp chilli flakes
1tsp fennel seed, crushed

Put the steaks into a lidded container or secure ziplock bag. Add the marinade ingredients and coat the meat thoroughly.

Marinade for 3 to 24 hours.

Remove from the marinade, season with salt then pan fry. 


Moroccan spiced lamb marinade


When I think of lamb though, I head over to Morocco for those earthy spices contrasting with uplifting mint. Serve with a pomegranate seed flecked, herbed couscous crumbled with feta.

2 lamb chops or steaks

1.5 tsp ground cumin
1 tsp ground coriander
half tsp ground smoked paprika
Half tsp ground cayenne
Small bunch of fresh mint, chopped
Zest and juice of one orange
Little dash of honey
30ml olive oil
Freshly ground black pepper

Put the chops into a lidded container or secure ziplock bag. Add the marinade ingredients and coat the meat thoroughly.

Marinade for 2 to 4 hours.

Remove from the marinade, season with salt then pan fry.


The pork steaks and Barnsley chops were provided by Donald Russell. Normally I dry out chops and don't particularly like them but these were succulent and beautifully flavoured - yes I have seen the chop light! You can see a full range of their products and also get some more marinade inspiration here http://www.donaldrussell.com/marinating-menu
Share
Tweet
Pin
Share
No comments

I love simplicity in tapas. I normally go for chorizo cooked in sherry (obviously!), Manchego cheese and quince jelly, slices of Ibérico ham, a finely layered potato tortilla, some marinated anchovies, maybe a ham and cheese croquette, padron peppers,pan con tomate and if there is a nice octopus dish...ok, ok...it's pretty easy to get carried away. 
But one dish I do like, which is rarely on the menus, is Papas Arrugadas with Mojo sauces. This is regional to the Canary Islands and something I discovered with Mr Graphic Foodie back in the day when we were young, carefree and wrecking our cheap 1ltr white Nissan Micra by driving it off road to Playa de Papagayo. And when we weren't breaching our car hire lease conditions, we were propped up somewhere, ordering these wrinkly potatoes with a salted crust, dipping them in fiery mojo sauces. They really are one of best holiday food memories I have.

And as Alhambra were nice enough to send over a case of their Alhambra Reserva 1925 beer, I thought I'd remember what summer was like (is it EVER going to stop raining?) and recreate that holiday vibe. There are so many variations of mojo sauces but I've stuck to the two classics of spicy red and smoother parsley mojo sauce but you can try avocado or orange based ones too.


Although not much of a beer drinker, I really enjoyed the Alhambra Reserva 1925. Crisp, premium and really full bodied flavour. It was actually quite elegant. It was also refreshing to drink something traditional and not from the neue craft beer genre with zany labels and pumped up social media feeds. Anyway, I loved it and you can try it too by winning a heritage set of Alhambra Reserva 1925 beer yourself - see the end of post for details.


Papas Arrugadas with Mojo sauces

For the potatoes
500g small new potatoes, skin scrubbed
about 30g sea salt
1 litre water

For the Red Mojo Picon
150ml neutral tasting oil
1 large red pepper, deseeded and chopped
2 cloves garlic, peeled
1 fresh, hot red chilli
50ml white wine vinegar or cider vinegar
1/2 teaspoon sea salt
1/2 teaspoon smoked paprika
Pinch of saffron

For the Mojo Verde
150ml neutral tasting oil
2 cloves garlic, peeled
50ml white wine vinegar or cider vinegar
1/2 teaspoon sea salt
1/2 teaspoon ground cumin
40g fresh coriander

Method

Preheat the oven to 150C.

Put the potatoes into a pan with the salt and water and bring to the boil. Reduce the heat and simmer for 25-30 minutes until the potatoes are tender. Drain off any excess water and allow to steam dry slightly.

Place on a baking tray and bake in the oven for 15 minutes, until the skins have started to wrinkle and the potatoes get a slightly crystallised coating from the salted cooking water.

To make the sauces, just place all of the ingredients into a processor and process until a sauce has formed. Do this for each version.


Competition

a Rafflecopter giveaway

I was sent a case of Alhambra Reserva 1925 beer for review. Opinion and content, as always, are my own.
Share
Tweet
Pin
Share
No comments

This is ideal is a quick, healthy midweek meal. It's a pretty standard fish stew recipe that is made more special with a few simple fresh toppings that elevate the flavour. Add a glass of chilled white wine and pretend you're on holiday whilst blissfully ignoring the grey British weather outside.

Serves 4

2 tbs olive oil
1 white onion, chopped
2 garlic cloves, sliced
Half fresh red chilli, finely chopped
Teaspoon smoked paprika
1 red pepper, deseeded and chopped
2 carrots, peeled and sliced
New potatoes, scrubbed or peeled and sliced
400g tin of tomatoes
Fish stock, about half a tin can, fresh or made with stock cube
A handful of frozen peas
A generous handful of king prawns, defrosted if frozen or fresh
4 white fish fillets, skinned, deboned and cut into chunks

Topping;
A handful of flat leaf parsley, finely chopped
Zest of one lemon, finely grated
Garlic clove, finely chopped
Lemon juice
Olive oil

Heat the olive oil in a saucepan and gently fry the onion until soft. Add the chilli, garlic, paprika and continue to cook for a couple of minutes.

Add the remaining chopped vegetables and saute for a few minutes. Add the tinned tomatoes, stock and simmer for 15 minutes until the potatoes are tender.

Add the peas, fish and prawns and cook for a further 5-10 minutes until cooked through. Season to taste.

Serve in bowls and top with a little of all the toppings, a squeeze of lemon juice and drizzle with olive oil. Enjoy with plenty of crusty bread.
Share
Tweet
Pin
Share
No comments

I have no idea why I haven't come across a rolling pin like this before. We all know how essential non-stick frying pans are but whenever I roll out pastry or pasta, it ALWAYS sticks to the pin! (Note: I'm not the world's most patient or proficient baker.)


The OXO Good Grips non stick rolling pin is a heavy beast. Aside from the coating,  I love the shaped handles that always remain the right way up due to the weighted design. The handles enable you to keep your grip (rather than rolling with the flat of your hands) and also stop your knuckles bashing the worktop.


The pin is also 30cm wide, so you can get a decent crust top or size rolled out evenly.

Although I don't use a lot of pastry, when I do, it's normally a beautiful, glossy crostata, which is a large Italian jam tart. Delicious on its own or with a big dollop of sweetened marscapone.


Ingredients
500g self-raising flour
200g butter  
150g white sugar
Grated rind of one lemon
3 egg yolks plus l whole egg
Vanilla essence (few drops)
One jar of jam (any flavour) or Nutella!
Milk or beaten egg for glazing

Method 

  • Cut butter into cubes & rub into flour until it resembles breadcrumbs.
  • Add sugar and grated lemon rind
  • Beat eggs and add to mix with the vanilla essence
  • If mixture is dry, add a little milk until it all comes together and forms a ball (take care not to make it too wet – add milk a little at a time)
  • Leave to chill in fridge for half an hour
Preheat the oven to Gas mark 5 / 190°C / 170 °C (fan)
  • Grease a large, loose bottomed flan tin approx 12 inches in diameter
  • Roll out pastry sufficiently to cover bottom and sides of flan tin
  • Gently ease the pastry into flan tin and trim off any excess pastry around rim of tin
  • Add jam to the pastry inside the flan tin and spread out evenly to cover the base
  • With remaining pastry, roll out and cut strips half an inch wide (use pastry wheel if you have one to make the edges of the strips decorative) and arrange on top of the jam, leaving an inch or so between each strip.
  • Fold down the pastry on the sides of the flan tin until they seal in the strips & press firmly all around.
  • Brush with beaten egg or milk and bake on the middle shelf of a preheated oven at Gas 5 for about 40 minutes or until the pastry is golden brown.
  • Take out and leave to cool completely in the tin.


I was sent OXO Good Grips products for review. Words and views, as always, are my own.
Share
Tweet
Pin
Share
No comments

My pig's cheeks in cider with roast apple slices is one of the most popular recipes on this blog. It still gets a ton of hits. The main difference is that back then in 2010 when I wrote the post, you could get a bag of cheeks for £1.20. Now word is very much out that these gelatinous, melting soft pillows of meat are not just dog bowl fodder, but one of the prized parts of the pig, the price has racked right up. This last bag of cheeks cost £7.99/kg from Waitrose so nearer £5.50. Still, grab some if you can get them (the things are scarce these days!) as the reward it worth it at any cost. 

The other change is that now we have a child, cooking things in booze isn't really ideal so I have crafted a recipe that slowly cooks the cheeks in stock. The cider vinegar replaces the acidic twist I think a good sauce needs instead. Normally I pop these in the oven but 2 hours gently simmering on the stove was just as good. I served the cheeks with wet Parmesan polenta and sprout flowers, but good ol' mash and savoy is good as well. 


Serves 2-3

Olive oil
1 medium white onion, chopped
1 clove of garlic, crushed
Plain flour, for dusting
Seasoning
700g pigs cheeks (about 8 medium sized cheeks)
30 ml cider vinegar
600ml chicken stock (700ml stock for 1.5kg cheeks)
2 medium carrots, peeled and chopped
1/4 swede, peeled and chopped
100g button mushroom, cleaned and left whole if small or halved
2 bay leaf
2 rosemary sprig
Heaped tbs tomato puree

Trim the cheeks of excess fat, removing any membrane, sinew etc.

Heat 1 tablespoon of olive oil in a large, heavy bottomed casserole pot and gently fry chopped onion until translucent. Add the crushed garlic clove for a few minutes. Remove both from the pan and set aside.

In a shallow bowl, season the plain flour and dust each pig cheek in it. Add more oil to the casserole pot and brown cheeks evenly. Do this in batches so the pan doesn't get crowded.

Remove the cheeks and set aside. Add the cider vinegar and a dash of the chicken stock to thoroughly deglaze pan, scraping any flour off the bottom of the pan.

Add back in the onions, garlic, pigs cheeks, herbs, remaining stock and tomato puree.

Simmer gently for 1.5 hours, giving the casserole a stir and checking that the sauce does not reduce down too much. It should thicken well, but add more water if it looks like it may dry out.

Add the swede and carrots back in and cook for a further 30 minutes until they are tender but still firm. Add the mushrooms and cook again for 10 minutes. 

Turn off the heat and just allow the casserole to stand for 15 minutes. This helps it become even more tender. 

Before and after 2 hours
Share
Tweet
Pin
Share
No comments

I love a good coffee in the mornings and when I get one, it's more often than not a latte. It's what most Italians will have in the morning with a biscuit or pastry. (Lattes and Cappucinos are never drunk past noon and never after a meal! Espresso or Macchiato for that.)

But you can create a pretty decent coffee at home too. I had to go on a dairy free trial this month (I'm feeding a particularly windy baby and dairy could have been the culprit) but still managed to keep my precious daily coffee in with dairy alternatives, especially as I'm averaging 4 hours of sleep these days. Alpro Almond milk was my favourite but I was very surprised at how much I liked the Alpro soya milk. Personally, I didn't like the unsweetened version so had to get the one with added sugar. Regardless, these methods work for milk or soya milk fine although with dairy, skimmed or semi skimmed milk rather than full fat works best for frothing.


1. Milk
A good latte is obviously all about the milk. I've always found the Nespresso milk foam jugs really effective but if you don't have one I suggest the following.

Frother tool
These are cheap and cheerful little tools that you can pick up for a few pounds. Warm your milk/soya then turn on the frother with whisk placed near the base of the mug and slowly raise and lower the unit as foam develops.

Jar method
Slightly more alternative, but it works! Fill a glass jar half way with milk/soya and heat in the microwave for 30 seconds. Put the lid on and shake for 30 seconds. Remove the lid and microwave the jar for another 30 seconds (this step helps retain the foam).

2. Coffee
I found out at my Small Batch barista class that coffee and temperature is vital to a good coffee. Here I'm using their Goldstone blend in my classic stove top moka pot.

3. Making the latte
Pour one shot (30ml) or a double shot of espresso in your cup. Add sugar if you take it. Take your milk/soya milk and pour about 240ml into the cup, withholding the foam back with a teaspoon. Then scoop the milk foam on the top to form an even layer. You are looking at about 10mm of foam.

Thanks to Alpro for providing the soya milk.
Share
Tweet
Pin
Share
No comments

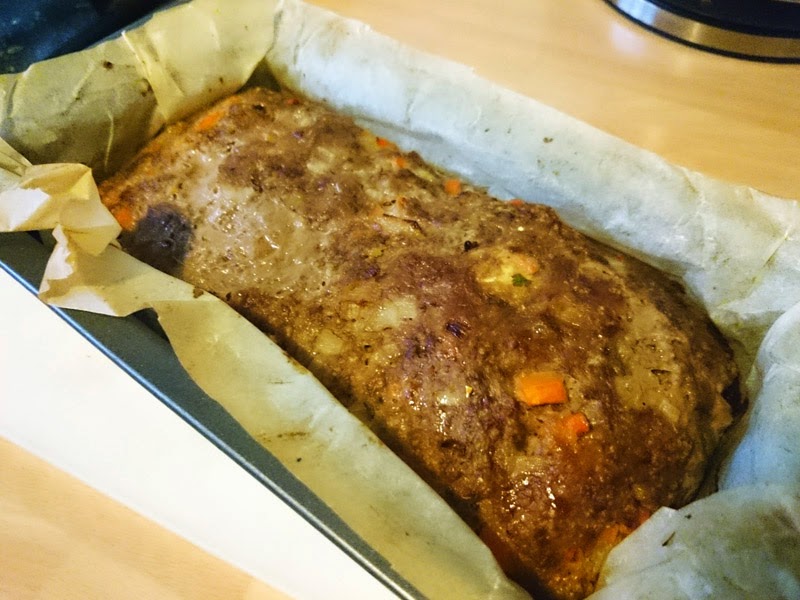
Most people are familiar with the adopted American version of this meatloaf but few will have come across the Italian polpettone, which translates as "giant meatball"! This is a classic Sicilian dish, really family friendly and is easy to make. And slicing into it to reveal the "surprise" (a line of hard boiled eggs) is always a perk, but that may just be me!

I prefer a mixture of meats for this, ideally pork and veal but you can also use a ratio of beef instead.

Serves 4

1tbs olive oil
1small of onion, finely chopped
1 large carrot, finely chopped
2 cloves of garlic,  finely chopped
600g minced Meat. I like a 50/50 mix of either lean beef and pork or pork and veal
80g of pangrattinato (Italian dry breadcrumbs) or equivalent of freshly made breadcrumbs from day old bread
1 egg, lightly beaten
50g freshly grated Parmesan
Parsley, finely chopped, about 1 heaped tablespoon
1tsp dried oregano
Freshly grated nutmeg to taste
Seasoning
3 hard boiled eggs, shelled
Olive oil

Preheat the oven to 200C

Line a small loaf tin with greaseproof paper.

Heat the olive oil in a frying pan and gently sautée the onion, carrot and garlic until softened.
In a large mixing bowl place the meat(s), breadcrumbs, beaten egg, Parmesan, herbs, nutmeg, cooked onion and carrot mixture and seasoning. Mix this thoroughly with your hands.

Place about a third of the mixture in the bottom of the lined loaf tin.  Pack another third around the sides, leaving a cavity for the boiled eggs.


Arrange the boiled eggs in a line long ways in the cavity and then place the remaining meat on top. 
Press the loaf firmly and shape the top, rounding the edges slightly. Drizzle the top with olive oil.

Bake in the oven for about 40 minutes or until cooked through, covering the top with foil about halfway through the cooking time.

Allow to rest for 20 minutes, tightly covered with foil.


Serve with gravy or more authentically, a simple tomato sauce with greens and sautéed potatoes.


Share
Tweet
Pin
Share
No comments

Who doesn't like a RIOT of colour on their plate? This salad, inspired by one on the menu at La Choza is uplifting, satisfying and healthy. Adding chilli garlic prawns gives it a little more substance for a complete meal but would also be good with shredded chilli marinated chicken too.

The only effort is shredding everything, not so much if you have a good food processor but I zip everything through my mandolin because I like a little danger in my life.


Mexican Street Food Salad with Chilli Garlic Prawns
Serves 2

Ingredients
Half a red cabbage, shredded finely
3 carrots, peeled and sliced into thin discs
100g radishes, sliced into thin discs
Half red onion, shredded finely
Large handful of coriander, roughly torn

Dressing
Olive oil
Juice from 1 lime
Green chilli, finely chopped
Sea salt

Chilli prawns
Olive oil
200g raw king prawns, defrosted if frozen
Clove of garlic, crushed
Red chilli, finely chopped
Sea Salt

To serve 
Optional - sliced ripe avocado and toasted tortillas

Method
Prepare all of the ingredients for the salad base using a mandolin, food processor or sharp knife and patience.

Heat the olive oil for the prawns in a large frying pan, add the chilli (to your heat preference) and garlic, fry for a few seconds then add the prawns. Fry for a few minutes, turning regularly until cooked through. Season.

Dress the salad with a good glug of olive oil, lime juice (you need a lot) and green chilli (to your heat preference). Season with salt if it needs it.

Arrange on a plate, top with the prawns with the avocado slices along with the toasted tortillas if using.
Share
Tweet
Pin
Share
No comments

We're slap bang in the middle of a fashion for ever increasingly complex food where everything needs to be processed and bothered with sodium alginate, maltodextrin or methyl cellulose powder to impress us. But I find myself craving simplicity more and more.

Admittedly there is something admirable about the skill and techniques used by leading chefs to dehydrate, sphere and transform everyday foods into something unrecognisable, but for me, the real talent of cooking comes from turning a handful of simple ingredients into something delicious. Mammas of Italy have been doing this for centuries, and cucina povera is something that Italy still celebrates. It's the ultimate respect of food, be it the humble tomato or a piece of guanciale.

Risi and Bisi isn't actually from my region (Abruzzo), but a dish from Venice. But nine times out of ten, if I'm home alone, I'll be cooking this for myself. Essentially it's the Italian equivalent of rice and peas, a little like risotto but far soupier.  As with all simple recipes, they are made better by great quality so the recipe lists some pointers to make it really special.

Either way, I'd generally rather have a plate of this than a dish of dehydrated mackerel cheeks with popcorn powder.

Serves 4

2tbs Olive oil
Small white onion, chopped finely
1 clove of garlic, crushed
60g of pancetta, cut into small cubes (not too much of the fat)
400g peas, frozen is fine but freshly shelled is best when in season
200g of rice, vialone nano, aborio or carneroli
Few stalks of flat leaf parsley, chopped finely
1ltr chicken stock, best you can
Parmigiano Reggiano

Heat the olive oil in a saucepan and gently fry the onion until slightly transparent and without colour.
Add the pancetta and fry for 2-3 minutes. Add the peas, garlic, rice and parsley and fry again for 1-2 minutes until well coated. 

Add the hot stock and cook for 10-12 minutes, until the rice is tender. If the rice absorbs too much of the stock just add a little more boiling water, you want to retain a slightly soupy consistency. 

Season to taste with salt and freshly grated Parmesan, which will give the dish a slight creaminess.
Share
Tweet
Pin
Share
No comments
Although fusion cooking isn't something I normally venture into, this is another of my haggis recipes given an Italian twist. And it works! The Macsween Wild Boar Haggis is lovely, flavoured with pear, bacon and spices, all things that are perfect in arancini. Alternatively, you could fill the arancini with regular haggis, or more classically, a reduced Bolognese sauce or even just a cube of mozzarella.

Fresh truffle is ideal (isn't it always) but truffle oil is also fine, just don't use too much is as it can be overbearing.

Makes about 8 arancini

Recipe

For the risotto
1 tbs olive oil
Half an onion, finely chopped
200g of mushrooms (chestnut, porcini) wiped clean and chopped
1 garlic clove, crushed
10g Dried Porcini mushrooms
260g Arborio or carnaroli risotto rice
One small glass of white wine
1.5L of stock (I make this up with a STAR Porcini stock cube, available from Italian delis and Carluccio's)
Truffle oil, or better, fresh truffle
40g Parmesan cheese, freshly grated
Seasoning

Make up the stock and keep on a low simmer in a separate pan.

Hydrate the dried mushrooms by covering them in boiling water and allow to stand.

Heat the olive oil in a large pan, and add the onions, gently frying until soft but without colouring. Add the mushrooms and continue to cook until soft and all the liquid released has evaporated. Add the crushed garlic clove and cook for a minute or two.

Drain the dried mushrooms, reserving the liquid, and finely chop. Add these to the pan.

Add the rice and stir for a few moments, then add the liquid reserved from the dried mushrooms.

Add the glass of white wine and stir until absorbed. Then add ladles of the stock to the rice, stirring the whole time. Add another ladle once the last has absorbed. Continue until the rice is tender but still has a little bite to it.

Remove the pan from the heat, add the Parmesan and just a few drops of truffle oil (don't over do it) or fine shavings of fresh truffle. Season to taste.

Spread the risotto on a large flat plate or tray and allow to cool completely.

For the arancini
One pack of Macsween Wild Boar haggis
2 eggs, beaten
Italian breadcrumbs (pangrattato)
Seasoning
vegetable oil for deep/shallow frying

Cook the haggis as per the packet instructions, remove the casing and allow to cool slightly.

Heat your oil in a high sided saucepan for deep or shallow frying.

In one bowl place the beaten eggs and season well. In another bowl place the breadcrumbs.

With wet hands, take about 100g of your cooled risotto and spread flat in your palm. Place a heaped teaspoon of haggis in the middle then wrap the risotto around the filling, forming an even sphere. repeat with the remaining risotto.

Roll the balls in the egg, then the breadcrumbs.

Check the temperature of the oil with a little bread, then fry the aracini in batches so they are evenly golden.

Drain on kitchen paper and serve warm.
Share
Tweet
Pin
Share
No comments
Older Posts

The Graphic Foodie

About Me

With a love of my home town, this blog lists frequently updated Brighton restaurant reviews for both Brightonians and visitors to navigate to all the best food spots in the city. Although the focus is on our fantastic local independent restaurants, you can also discover selected cafes, supper clubs and pop-up restaurants. In the mix are also my kitchen experiments and family recipes from the Abruzzo region of Italy, food-related design, product reviews and book recommendations.

Follow

  • instagram
  • twitter

Categories

review restaurant product pizza takeaway travel drink

recent posts

Blog Archive

Popular Posts

  • RECIPE: Red Velvet cake from the Hummingbird Bakery
    Ever since seeing the Armadillo wedding cake in the 1989 film Steel Magnolias, I have been slightly obsessed with the Southern United Stat...
  • RECIPE: Elderflower Cordial without Citric Acid
    If you are super quick and very lucky, you may just get the end of the elderflower season. I was randomly bimbling home along a pedestria...
  • PRODUCT REVIEW: Tefal Ingenio range
    For essentially a space saving pan system, I don't know why I was still amazed that the box the set came in was so small. Inside there...
  • GF Guides | The best and worst pizza in Brighton and Hove
    Another post banging on about pizza. Oh yes! And this one is going to be the growing mamma of all Brighton pizza reviews, so get comfort...

Created with by ThemeXpose